2010年11月29日星期一

How to Put Youtube videos on iPod, PowerPoint ,etc for free

This guide will show you how to download video content from numerous sites (youtube, Google Video,etc) and convert videos to iPod on Mac using two methods. It is pretty simple for according to the following statements.
iPod, iPhone accepts mp4 video detail as follow: MPEG-4 video, up to 2.5 Mbps, 640 by 480 pixels, 30 frames per sec., Simple Profile with AAC-LC audio up to 160 Kbps, 48 kHz, stereo audio in .m4v, .mp4, and .mov file formats.
PPT accepts: mpeg, asf, avi, wpl. wm, wmx, wmd, wmz, dvr-ms, mpv2, mp2v, mov, etc

1. Using free online YouTube converter
The first method is using a website to convert youtube video to iPod or powerpoint for free, Of course, you can also convert other media videos.
This is good for you when you only have one file to convert or you can't install the programs necessary for conversion. My favorite is zamzar converter.
You don't even need to download the video file to your computer. Enter the URL of the video to the box, choose the format you want to convert youtube videos to (iPod accepts mp4 video. So choose the format 'mp4'), and Enter your email address , then click 'convert'. The output file will be sent to your mailbox after the conversion.

zamzar converter

Another free online converter I like is media convert.
But you can't convert big video files using free online converters. It is up to 100MB. And the quality of the output files is so.

Tip: How to put pictures and photos to iPod, iPhone
1. Download iTunes from http://www.apple.com
2. Plug your iPod in to iTunes
3. Make a folder on the computer with all of the photos you want on your iPod (Name it something you with remember!)
4. Click on the iPod icon in iTunes
5. Click on the Tab "Photos" on the top.
6. Check the box "Sync photos from:"
7. Chose the folder all of your photos are in.
8. Click apply, then eject your iPod and enjoy your photos!

2. Using iPod video converter for Mac
The Second Method is using iPod video converter software to convert Youtube videos to iPod on Mac for free.
For this you need the following:
1. A video to download.
2. iPod Video Converter (Mac OS X version / Windows PC version).
Step 1: Download the videos
The downloaded file might be two formats: avi and flv . iPod and iPhone only support mp4 format. So you need to convert the videos to MP4 files.
PowerPoint understands .avi. If it the file is .avi, you do not need to convert it to put it on PPT. But most videos will probably be in .flv format. You can't embed Flash in PowerPoint. These will need to be converted to .mpeg or .avi format.
To do these conversions, you will need video converter which is capable of doing the conversion.

Step 2: Converting The Video to iPod, iPhone, Powerpoint, etc
Great, now you have located the file and downloaded it to the desktop. What's next? Well, you need to open up your freshly installed Aiseesoft Video Converter for Mac.
Click the "Add File" button to add the video files that get from the video sites to the program by automatically selecting an appropriate encoder for the video files you want to convert to.
Select the output format on the output format list. Aiseesoft iPod Video Converter for Mac can convert videos to almost all popular video players like iPod touch, iPod classic, iPod nano, iPhone, Apple TV, PSP, PS3, Youtube (web), Creative Zen, iRiver PMP, Archos, various video mobile phones and many other digital video and audio players. If you want to put videos to PowerPoint, you need to convert the videos to avi or mpeg formats.
This process only lasts a few minutes at the most.
If you want to convert several videos into one file, what you need to is to click'merge into one file' option . As we know, the mp4 format is high conpatible with iPod, iPhone, Apple TV, PSP, so it the best format for converting to iPod, iPhone, etc.

2010年11月26日星期五

How to convert videos such as MP4, WMV, MOV and AVI to DVD for Free

DVD Flick is a free DVD authoring program that allows you to take a video file saved on your computer and converts it into a DVD that can play back in a DVD player, your computer, or Home Cinema set. The software allows you to add audio tracks and subtitles to your DVD. Your original video files may be in any of the following container formats: AVI, MOV, MPG, WMV, ASF, FLV (Flash video), Matroska and MPG. Supported codecs include MPEG-1, MPEG-2, MPEG-4, XVid, DivX, WMA and WMV (Windows Media Audio and Video), MP3, OGG Vorbis, H264 and On2 VP5/6. The program is open source.
DVD Flick is the all-in-one tool that can convert:
AVI to DVD, FLV to DVD, HDMOV to DVD, MKV to DVD, MJPG to DVD, MPG to DVD, M2V to DVD, MP4 to DVD, M4V to DVD, NSV to DVD, NUT to DVD, QT to DVD, MOV to DVD, RM to DVD, SMK to DVD, OGM to DVD, WMV to DVD, ASF to DVD, 3GP to DVD, 3G2 to DVD for free.
DVD Flick supports DVD Authoring, ISO image creating, DVD burning also in one tool.
System requirements:

  • A Pentium or AMD K-6 processor. Pentium 3 or later recommended, the faster the better.
  • 64 MB of free physical RAM, 128 MB or more is recommended.
  • Windows 2000, Windows XP , Windows Vista (If you are Mac user, use this Mac dvd creator)

Download the latest version of the DVD Flick website
If you are using Mac, Please click here to download the Mac DVD Creator

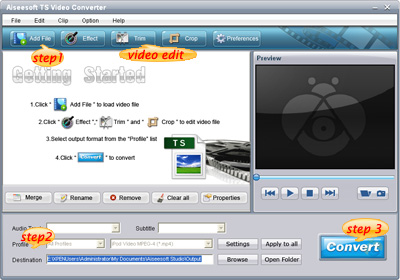
1. Download and run DVD Flick

DVD Flick

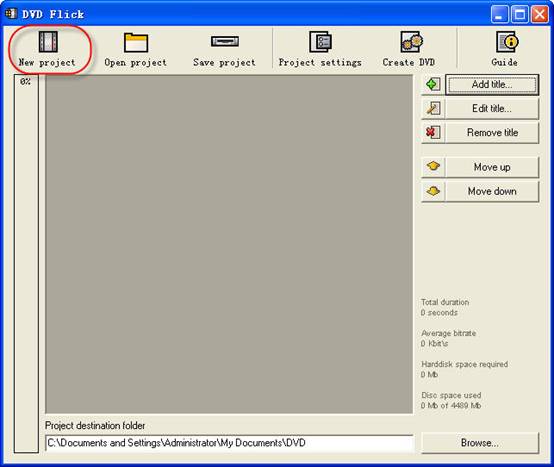
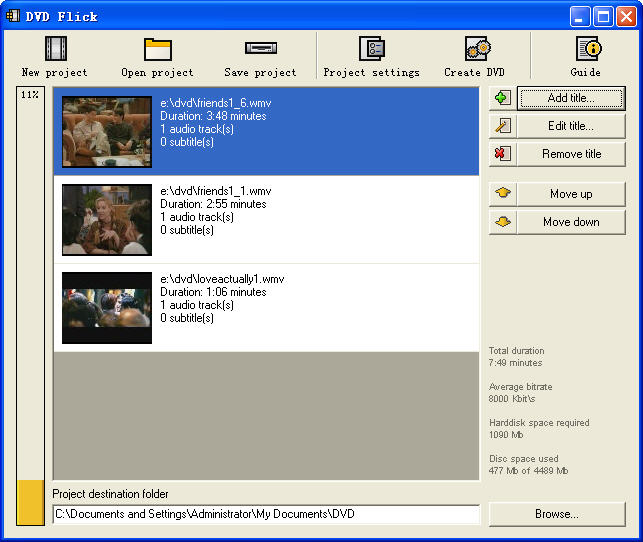
2. Click "New project” button to create a new project.
3. Browse your hard drives to select path to the folder, where the resulting DVD folders
(AUDIO_TS, VIDEO_TS) will be saved. It is highly recommended to use NTFS file system in your OS, cause the temporary m2v files in most cases exceeds 4GB limit for FAT32 file system. Additionally, don't use non-English letters to the browsing path, because the errors could occur during DVD authoring process.
4. Add your title - select the video file or files for the project. DVD Flick supports these video file types: AVI, FLV, HDMOV, MKV, MJPG, MPG, M2V, MP4, M4V, NSV, NUT, QT, MOV, RM, SMK, OGM, WMV, ASF, 3GP, 3G2.
5. Title added. Left bar indicates how many bytes is used on the blank DVD disc with the default preferences. The percentage depends on the video file size which you have added in the previous guide step.
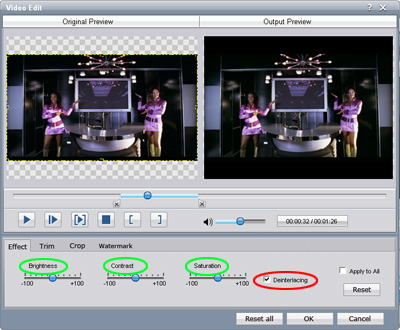
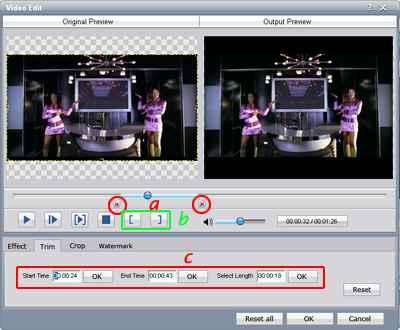
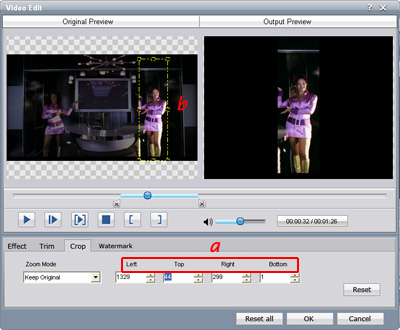
 DVD Flick - Title added

6. Edit title.
(1) General settings for the "Title".
reate chapters every: Purpose of the chapters usage is forward/back skipping forward during the DVD viewing. It is recommended to use this option.
You can also use fixed numbers of chapters - check "Create" button.
Aspect ratio is an auto detected value received from video file's frame dimension.

DVD Flick - Edit
(2) Video sources for the "Title" - this tab informs us about video codec, frame size, Aspect ratio value, frame rate - Frames Per Second.

DVD Flick - Title
Frame rate. Check the bottom listing:

  • 23,976 FPS - NTSC Film Format
  • 25 FPS - PAL Format
  • 29,97 FPS - NTSC Format
  • 30 FPS - NTSC Format Reccomendations for the non-standard
  • 12,5 FPS - PAL Format
  • 15 FPS - NTSC Format Warning! Remember the format for your file - it will be the same "Target format" in "Project settings" .

Add a file to a title: This option allow to you to add new file or files to the "Title". It could be additional videos for this DVD, cutted scenes for examples, etc. Important thing is the same FPS for the main video file and the additional file.
Remove a file to a title: You can also remove a file to a title.
(3) Audio tracks tab.
Remove an audio track: Press "Edit" button, then remove from the "Audio track sources" additional audio track.
Add an audio track: Press "Add" button on the ”Audio track sources" tab, select the audio file from hard drive, check in the new "select audio track(s)" window track(s) you wish to add. Press "Accept" button. DVD Flick could extract audio tracks from all supported video files (AVI, FLV, HDMOV, MKV, MJPG, MPG, M2V, MP4, M4V, NSV, NUT, QT, MOV, RM, SMK, OGM, WMV, ASF, 3GP, 3G2), and also native audio file formats: AAC, AC3, Flac, MKA, MP3, MP2, MPA, OGG, WAV, WMA
Select language for the additional audio track. Select the audio track, and then select from the”Track language" list box.
(4). Subtitles tab.
Add subtitles. Press "Add" button on the "Subtitles" tab, and then select from disk file with subtitles. DVD Flick supports these subtitles formats: AQT, JS, RT, SMI, ASS, SRT, SSA, TXT. Subtitle settings. Press "Edit" button to change subtitles settings. Select the language you need. Other settings are for the Font, Font size, and placement of the subtitles. As usually, press "Accept" button to save setting. "Force display" option will force subtitle displaying during playback, even they were not selected in menu.

DVD Flick - Subtitles tab

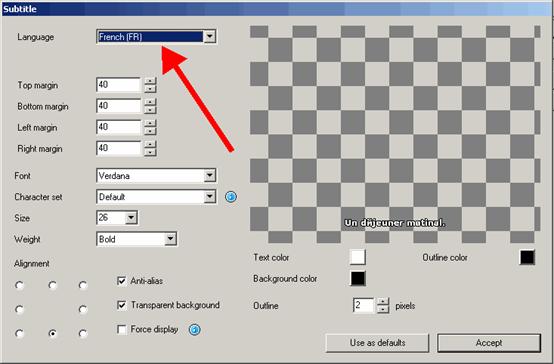
If everything was made rightly, we will see this window with the changed settings for subtitles. There are no more editing tabs for "Title properties". Press "Accept" button to save preferences.
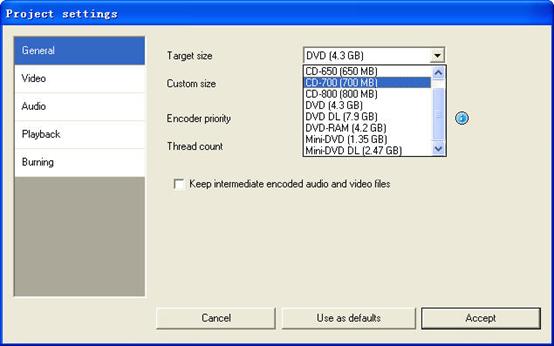
7. Project settings. At the DVD Flick main window press "Project settings" button.
General tab.
Select a "Target size" for your DVD from list box. The default value is "DVD (4,3 GB)", default values could be changed by pressing "Use as defaults" button. If you need to select custom DVD size just scroll up the list box to the "Custom" value and the bottom "Custom size" option will be enabled for editing.
"Encoder priority" allows to you to use "DVD Flick" with high priority in your operating system to decrease full encoding time.

DVD Flick - General tab.

Video tab.
Set your DVD "Target Format".
"Encoding profile" for better encoding performance is highly recommended to select as "Normal" or "Best". "Fastest" and "Fast" mode decrease full encoding time, but with the lower quality results.
"Target bitrate" is more easy to use as "Auto fit". This option will calculate bitrate for encoding automatically depends on DVD "Target size" and will be set as maximum possible value. If you have some advanced experience with DVD encoding, you can set "Custom bitrate".
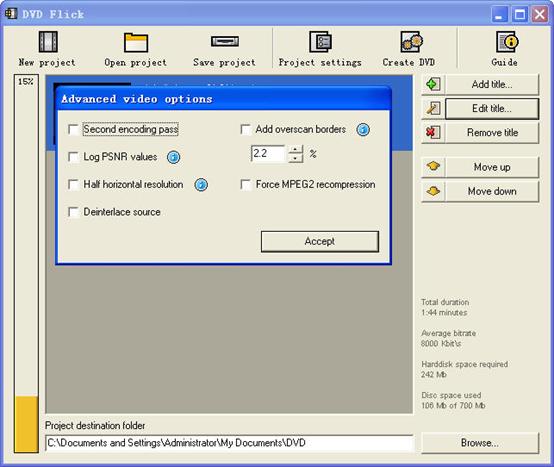
Set up advanced video options - press "Advanced" button.
Check "Second encoding pass" to improve output encoding results. It is highly recommended to use this option, but it wills increase full encoding time.
Check "Half horizontal resolution" to enable Half D1 DVD Mode - one of the standard for DVD, decreases frame size to 352x576 for PAL and to 352x480 for NTSC (instead of 720x576 (PAL) and 720x480 (NTSC)). Could be used as a possibility to decrease encoding bitrate, for more video length on one DVD disc.
Check "Add overscan borders" to make your DVD with black left and right borders to view all the source video on your TV.
Deinterlace option is not recommended to use.
Check "Force MPEG-2 recompression" to recompress your mpeg-2 video source files, do not check option if m2v files were encoded with Cam Video Tool 4 DVD Flick.

DVD Flick

Burning tab.
If the "Create ISO image" is set, the ISO image file will be created on your disk, in the "Project destination folder". ISO image could be useful, if you prefer to burn DVD using another application, supporting ISO images. "MDS" (Media decriptor) file will be created also. If you want to burn your DVD with DVD Flick, check "Burn project to disc" (red arrow). if you are using DVD+RW, DVD-RW disc, check "Automatically erase disc if it is rewritable". If quick erase will be not possible, ImgBurn (included in DVD Flick installation package) will make full erase for rewritable discs.
Accept all "Project settings" using "Accept" button. Now we are ready to burn our DVD.

8. Create DVD.
Press "Create DVD" button at the main window.
DVD Flick will ask for confirmation to proceed - press "Yes".
Additional warning about "Project destination folder" - Press "Yes".
"DVD Flick Progress" window shows to user all executed steps.
When the DVD burning will be done, we will see this window. Press "Close" to return to the DVD Flick main window. In the main window you can save DVD Flick project to your hard drive.

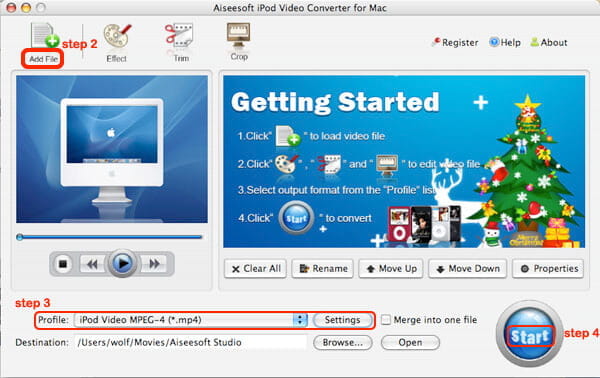
DVD Flick is only for Windows PC users. If you are Mac user, you can use this best DVD creator for Mac. It is a professional Mac DVD Burner program that converts almost all popular video formats such as FLV, MPEG1, MPEG2, MP4, DAT, 3GP, 3G2, MOV, AVI to DVD on Mac. And it can burn DVD movie playable on portable or home DVD player on Mac.

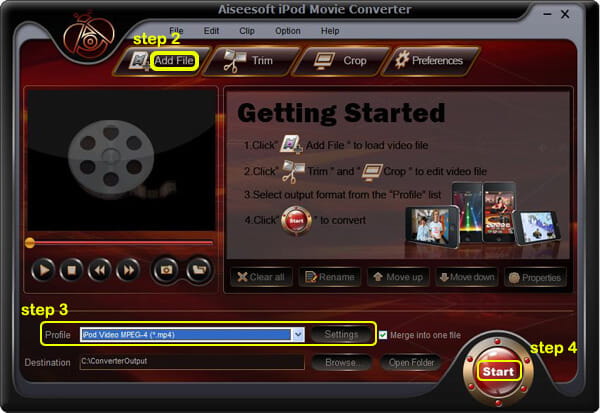
If you want to convert iTunes videos to DVD, you need to get the videos from iTunes to computer .
And then use DVD flick to convert iTunes videos to DVD for free.

If you want to burn YouTube videos on DVD, you can download the youtube videos to your computer.
And then using DVD flick to burn YouTube videos on DVD for free. If you are a Mac user, use this best dvd creator for Mac to help you. You can also copy videos form other video sites such as veoh, google video, iFlim, vidilife, blip.tv, music.com, zippyvideos, dailymotion, devilducky, etc and then burn them to DVD using this methods.

Here are some other DVD burner.
DVD Styler
DVD Styler is an open source DVD authoring system for Windows and Linux. It converts MPEG files, which you can drag and drop into its window, create NTSC/PAL DVD menus which are highly customizable (you can set image backgrounds, put text and images anywhere, change the font and colors, etc), set chapters for the movie, etc.
DivXtoDVD Perl Script
DivXtoDVD is a Perl script for Linux and other Posix systems (like BSD, Unix, Unix-like operating systems) that converts a DivX movie to DVD compliant files (AUDIO_TS and VIDEO_TS directories and files). It uses transcode, ffmpeg, mjpeg and dvdauthor to do the job in one step. The software is open source. Note that this is different from the commercial ConvertXtoDVD software which was also formerly named DivXtoDVD. If you're looking for the latter, a trial download is available.
ImgBurn
ImgBurn is a lightweight CD / DVD / HD DVD / Blu-ray burning application that everyone should have in their toolkit! It has several 'Modes', each one for performing a different task:
Read - Read a disc to an image file
Build - Create an image file from files on your computer or network - or you can write the files directly to a disc
Write - Write an image file to a disc
Verify - Check a disc is 100% readable. Optionally, you can also have ImgBurn compare it against a given image file to ensure the actual data is correct
Discovery - Put your drive / media to the test! Used in combination with DVDInfoPro, you can check the quality of the burns your drive is producing
Q DVD-Author
Q DVD-Author is essentially a GUI front-end for dvdauthor and other related tools found on a Linux system. You can create DVD menus, convert your projects between PAL and NTSC (and vice versa), create sub-menus, add subtitles, transcode your input videos from other formats, apply multiple audio streams to the videos, give menus multiple soundtracks, create a DVD slideshow, create animated menus, etc. This is an open source program that works under Linux and other Posix OSes.
KDE DVD Authoring Wizard
The KDE DVD Authoring Wizard allows you to create a DVD from a DVD-compatible MPEG-2 file (that is, it doesn't do the conversion from other formats for you). You can add multiple files and create a menu of the playlist if you wish. Your DVD menu can have multiple pages, a soundtrack from OGG or MP3, animated thumbnails and be in the NTSC or PAL format, be in 16:9 widescreen or 4:3 full screen, etc. This DVD authoring tool works under Linux. It is open source.

2010年11月24日星期三

Viewers May Be Willing to Watch More Ads Online. Lots More.

Viewers of television shows on the Web have grown accustomed to 15- and 30-second commercial breaks — a fraction of the time given for commercials on traditional TV. Would they accept TV-style ad loads?

Read the rest of this post on the original site

2010年11月22日星期一

Online TV Streams Come Under Fire

In the latest cat-and-mouse game between media companies and technology start-ups threatening to undermine their businesses, the big networks are intensifying their fight to stop Internet services that stream TV stations online.

Owners of the major broadcast-television networks are suing in federal court two start-up companies that stream broadcast TV stations online without their consent, arguing the start-ups are infringing on their copyrights. A judge in New York has scheduled a hearing Monday on the networks’ request for a temporary restraining order against FilmOn.com Inc., while another case against Ivi Inc. could be heard in coming weeks.

Ivi and FilmOn, which grab free over-the-air broadcast signals and convert them to online streams, are claiming their right to distribute the networks under a provision in the U.S. Copyright Act. Seattle-based Ivi is also arguing that Ivi isn’t governed by a separate communications statute that requires cable and satellite companies to negotiate licenses with content owners before transmitting their networks.

Read the rest of this post on the original site

2010年11月21日星期日

Netflix Web-Only Service Coming, Probably Not Cheap

Hate discs? Love Web video? Netflix should have something for you shortly: At the Web 2.0 conference yesterday, CEO Reed Hastings said a streaming-only option for U.S. subscribers should be available “shortly.”

It’s the third time this fall the company has talked up a Web-only service. And each time it does so it excites some of you who… really like the idea of not using DVDs.

The rest of you? You may be underwhelmed.

The big caveat here is we don’t know what Netflix plans to offer. But my hunch is the company won’t be able to offer a streaming-only option at a significant discount to its most popular $8.99-a-month plan, which also lets you stream unlimited video–and allows you to check out any DVD you want.

Note that:

  • The streaming-only service the company launched in Canada this year costs $7.99 a month.
  • Netflix has been testing the same service, at the same price, in the U.S. this fall.
  • Even though the Netflix streaming-only option only offers about 20 percent of the catalog available on its traditional DVD rental service, the company is paying big money for that catalog. Netflix has already racked up a $1.2 billion digital content bill, which could grow to $2 billion next year.

Netflix has also been testing out a price increase for its $8.99 streaming + disc plan, to $9.99 a month. Perhaps that’s to make the $7.99 option appear that much more attractive ($7.99 also happens to be the new price for Netflix competitor Hulu Plus).

And perhaps $7.99 will be just fine for people who don’t want to deal with discs and envelopes and mailboxes, and want instant video whenever they want it. Even if they can’t get everything they want.

In any case, this could all be moot. While I haven’t seen any reports of a streaming-only option priced below $7.99, Netflix has said it has run “many” tests. So perhaps it has a trick up its sleeve.

For giggles, I asked Netflix PR guy Steve Swasey what he could tell me. His response: “Stay tuned!”

Fair enough. I assume that “shortly” means “in time for the Christmas shopping season, when people start buying shiny new TVs and gadgets that work well with Netflix streaming.” And that kicks off on Black Friday–just eight days away.

2010年11月19日星期五

How to change iPhone Wallpaper

Here are the easy steps you can take to change iPhone Wallpaper easily.

Make preparations:
Step 1: Find an image that you would like to use as wallpaper from iPhone Wallpaper.
Step 2: Right-click on a PC or control-click on an Apple computer and select "Save As" to save the image to your computer. Save it to your "My Pictures" folder or iPhoto library on a PC or Apple respectively, or wherever you prefer to store your images on your computer as long as you will be able to easily locate it.
Step 3: Connect the iPhone to your computer with the USB cable and wait for iTunes to launch itself automatically. Click on the "Photos" tab in the side panel.
Step 4: Click on the "Sync Photos From:" tab in the "Photos" menu on iTunes and locate the folder where your photos are stored. Select all of the images that you would like to transfer your to iPhone. Click on "Sync" in iTunes to transfer all of the photos to your iPhone.

Change iPhone Wallpaper
Step 1: Tap Settings on the iPhone’s home screen:

Change iPhone Wallpaper

Step 2: Tap the Wallpaper tab:

Wallpaper Tab in iPhone Settings

Several tabs should appear, including one that says Wallpaper. You can tap any of the tabs to select wallpaper for the iPhone. The Wallpaper tab features a collection of pictures supplied by Apple. The other tabs feature pictures you have added to the iPhone, including those taken with the iPhone’s camera.

Wallpaper Selections

Step 3: Tap any picture. A preview screen of the wallpaper will appear, along with the words Move and Scale at the top. You can pinch and reverse pinch the picture to resize. The transparent bars at the top and bottom simulate the bars for the clock and Slide to unlock that will eventually display on top of your wallpaper.
In the example below you can see that the heads of the two peoples will be partially covered by the top bar:

Resize iPhone Wallpaper

To fix, I will reverse pinch to expand the picture, then drag the picture so that their faces appear in the center:

Resize iPhone Wallpaper
Step 4:
Tap Set Wallpaper to finish.
To view your new iPhone wallpaper, put the iPhone to sleep by pressing the sleep button on the top of the iPhone. Then hit the home button to wake the iPhone, and you should see the wallpaper.
Note the position of the clock and Slide to unlock transparent bars. If you’re unhappy with the position of the wallpaper, repeat the steps above.

2010年11月16日星期二

How to Rip DVD to iPod Touch, iPod Nano on Windows, Vista and Mac

The software you will need: DVD to iPod Converter Windows(DVD to iPod Vista) and DVD to iPod for Mac.
This guide will show you how to rip DVD to iPod Touch with these iPod Nano Converter.
The following video and audio formats are supported by iPod Touch/iPod Nano: H.264, MPEG-4, MP3, AAC, WAV. So for you enjoy DVD on iPod, you need to convert DVD to these formats.

Part One: How to rip DVD to iPod Windows, DVD to iPod Vista
Part Two: How to rip DVD to iPod Mac

Part One:
1. Download Aiseesoft DVD to iPod Converter Windows(DVD to iPod Vista), then follow the instructions to install and run it.

iPod Nano Converter

2. Click "Load DVD" to load DVD, DVD Folder or IFO files.
3. Click "Profile" to set the exact output format. Click "Settings" to set the exact parameters for your iPod. Select "Audio Track" and "Subtitle" for the output file.
4. After finishing all the pre-settings, click "Start".

Part Two:
1. Download Aiseesoft DVD to iPod Mac (Intel, Power PC). Install and run it.

DVD to iPod Mac

2. All the process are the same as DVD to iPod Windows.

Tips:
1. Click "Effect" to make special effect for your video.
You can adjust Brightness, Contract, Saturation of the video and the adjust the volume of music.
2. "Trim" function is for you to select the clips you want to convert.
3. Cut off the black edges of the original video and watch in full screen on your iPod using the "Crop" function.
4. This software allows you to join several DVD chapters into one clips by using "Merge into one file".

2010年11月14日星期日

How to convert MTS, TS, M2TS Video to HD video, MP4, WMV, AVI

Record everything around you and share with the world/friends/family is becoming more and more popular among young people. Get a HD Camcorder is necessary and also how to share is really important. I think you can use youtube.com, make a DVD and so on. As the video you record on your camcorder is MTS, TS, M2TS or other HD video format, so you have to convert them into normal video format to edit.

Today I will share with you how to convert MTS, TS, M2TS video to normal video formats.
You need 3 nice tool to do it: MTS Converter, TS Video Converter, M2TS Converter.

Part 1: How to convert MTS video
Step 1: Load Video
Click "Add File" to load the video that you want.

MTS converter

Step 2: Choose Your Output Profile and Settings
From "Profile" drop-down list you can choose your output profile according to your need.
For example, if you have a iPod and you want to convert video for it, you need to choose "iPod" from the profile list and then it also provides the second chance to specify your iPod generation.
You can also click "setting" adjust the settings of your output video, such as "video/audio encoder", "Video/audio Bitrate", "Channels", "Resolution" and so on..

Step 3: Video Editing
This powerful MTS Converter allows you to do many video editings.
1. Click "Effect" to make special effect for your movie.
You can adjust the "Brightness", "Contrast", "Saturation" and also you can use "deinterlacing" to improve you output effect.

effect

2. Trim:
"Trim" function allows you to pick up any part of your video to convert. You can just convert a part of your video that you want.

trim

3: Crop:
Cut off the black edges of the original movie video and watch in full screen on your iPod using the "Crop" function.

crop

Step 4: Conversion
After you have done all the steps above you can click "Start" button to start your conversion.

Part 2: How to convert TS video

TS video converter

Step 1: Load Video
Click "Add File" to load the video that you want to convert.

Step 2: Choose Your Output Profile and Settings
From "Profile" drop-down list you can choose your output profile according to your need.
You can also click "setteing" adjust the settings of your output video, such as "video/audio encoder", "Video/audio Bitrate", "Channels", "Resolution" and so on..

Step 3: Conversion
After you have done all the steps above you can click "Start" button to start your conversion.

Tips: Video Editing
This powerful TS Converter allows you to do many video editings.
1. Click "Effect" to make special effect for your movie.
You can adjust the "Brightness", "Contrast", "Saturation" and also you can use "deinterlacing" to improve you output effect.
2. Trim:
"Trim" function allows you to pick up any part of your video to convert. You can just convert a part of your video that you want.
3: Crop:
Cut off the black edges of the original movie video and watch in full screen on your iPod using the "Crop" function.

Part 3: How to convert M2TS video

M2TS converter

Step 1: Add File
Load your M2TS video.

Step 2: Choose Profile and Settings
Select your output profile according your need and adjust the settings of your output video if you like.
(the default setting works well)

Step 3: Start Conversion
Click "Start" to begin your conversion.

2010年11月12日星期五

Ellison to Self: Damn, Damn. I Knew I Should Have Said $4.5 Billion

Whatever damages Oracle is awarded in its suit against SAP, they’ll be $500 million lighter, thanks to an order by the judge presiding over the case. Judge Phyllis Hamilton has prevented Oracle from including in its damages estimates any potential lost profits from products it might have sold to customers it lost because of the SAP-TomorrowNow debacle.

So when Oracle’s damage expert, Paul Meyer, offered his estimate of what SAP should pay Oracle it ended up being $1.66 billion, which is obviously a substantial sum, but less than the one Oracle has been seeking and significantly less than the $4 billion figure Oracle CEO Larry Ellison was tossing around on Monday.

Good news for SAP–particularly after yesterday–and one that the company hopes is the beginning of a trend. “The ruling of the Court has an immediate and demonstrable impact on Oracle’s damages presentation, reducing the total by $500 million, from $2.2 billion down to $1.6 billion,” an SAP spokesperson told me. “This is the second such reduction by the Court and we are confident that, when the jury hears our case presentation, the outcome of the case will reflect the actual damages the limited actions of TommorowNow had upon Oracle.”

Oracle declined to comment on the matter.

PREVIOUSLY:

2010年11月10日星期三

Like Movies, Only Shorter: Movieclips Rounds Up More Cash

Here’s an interesting niche video play: Movieclips, a site that does exactly what it sounds like.

The company launched in beta a year ago, and it was fairly rough at the time–its catalog of clips was limited, and navigation was much tougher than it should have been.

But now Movieclips is much easier to get around, and the catalog seems much more substantial, at least from the outside. In any case it’s enough to convince investors, led by Shasta Ventures and First Round Capital, to put in $3 million in a Series A round.

The big question is whether Movieclips can train users to visit when they want to find a movie clip, instead of looking on Hulu or Google’s YouTube.

Because at Hulu, for instance, you can watch not only this scene from “Fast Times at Ridgemont High” but you can see the entire film–which is still great nearly 30 (!) years later.

Still, worth playing around with. It’s our time, as Spicoli would say.

2010年11月8日星期一

This Day in Robot History

When robots finally gain enough communal sentience to establish their own cultural holidays, this date might be one of them. Today is the third anniversary of the open-source Robot Operating System, born out of Stanford’s STAIR project, developed and nurtured by personal-robot maker Willow Garage, and now used in projects around the world. For a quick sampling of the work being done with this platform, here’s a video montage.

How to Rip DVD, Convert Video to iPhone, backup iPhone info, make iPhone Ringone For Windows/Mac

Recently, iPhone has became a really important part of our life. People use it to make a phone call, enjoy music and movies/videos, and play games. Today I will share you a really nice software pack, which can convert DVD and video to iPhone video/audio formats, backup iPhone info on your computer, and make iPhone ringtone easily.

What you need is just this nice Convert DVD Video to iPhone software

iPhone Software Pack

Part 1: How to convert DVD movies to iPhone
Use Aiseesoft DVD to iPhone Converter.

DVD to iPhone Converter

Step 1: Load DVD
Put your DVD in your DVD Drive and click “Load DVD” button

Step 2: Choose output profile and Settings
You can choose your output profile in the drop-list when you click profile list.
You can also adjust your settings, such as Resolution, Bitrate, so on.

Step 3: Edit Video
You can do “Trim”, “Crop”, “Merge into one file”and other video editing functions to make your video more enjoyable.

Click “Start” to begin you conversion. After few mins you can enjoy your DVD movies on your iPhone.

Part 2: How to convert videos to iPhone with iPhone Movie Converter

iPhone Movie Converter

Step 1: Add file
Click “Add File” button to add your video you want to put on your iPhone.

Step 2: Choose output profile and settings
You can choose your output profile in the drop-list when you click profile list.
You can also adjust your settings, such as Resolution, Bitrate and Encoder and so on.

Step 3: Edit Video
You can do “Trim”, “Crop”, “Merge into one file”and other video editing functions to make your video more enjoyable.

Click “Start” to begin you conversion. After few mins you can enjoy your videos on your iPhone.

Part 3: How to transfer songs and vdieos from iPhone to computer, from computer to iPhone and from iPhone to iPhone.

iPhone Transfer

Step 1: Click iPhone Transfer
Click “Computer to iPhone”(1) button, it will allow you to transfer songs and videos from your computer to iPhone easily.
Click “iPhone to Computer”(2) button, it will allow you to backup your songs and videos from iPhone to your computer.
Click “iPhone to iPhone”(3) button, it will allow you to transfer songs and videos from one iPhone to another iPhone dirrectly.

Part 4: How to make your own iPhone ringtone

iPhone Ringtone Maker

Step 1: Click iPhone Rigntone Maker and click “Browse” on the right side of "Input File" to import the file that you want to make ringtone from i.t

Step 2: Play it and listen the music to find the segment that you want to use it as ringtone. Then drag and click the start& end slider to set your wanted segment, or type the start & end time in the corresponding text box directly to get the exact segment. You also can pre-listen the converted audio before generate.

Step 3: Click “Browse” on the right side of "Local Output Folder" to choose the output destination.

Step 4: Check "Export to iPhone" option, the converted ringtone will be load to your iPhone directly.

Step 5: After all the settings are finished, click “Generate” to begin making your own iPhone ringtone.

For Mac users I recommend you Aiseesoft iPhone Software Pack for Mac

Using Aiseesoft iPhone Software Pack for Mac, you can convert any video/DVD to iPhone Mac, backup the audio, video files on iPod to Mac and import audio, video files or folders from Mac to your iPod without iTunes with the help of iPod Manager Mac, even make iPhone ringtone from AVI, MPEG, WMV, MP4, FLV, MKV, H.264/MPEG-4, DivX, XviD, MOV, RM, RMVB, MP3, WMA, AAC video and audio sources on Mac.

iPhone Software Pack for Mac

2010年11月7日星期日

How to upload videos to YouTube easily and quickly on Mac

Google has released basic software called Vidnik which is the quickest, simplest way to make movies using the built - in camera on your Macintosh and upload those movies to your YouTube account. You must first sign up for a free YouTube membership to upload videos. You can use Vidnik to create a video diary, or just to quickly record a video comment to attach to an existing YouTube video. Vidnik works with the built-in video cameras on recent Macs, with Firewire video cameras, and with many USB video cameras.

Part 1, use Vidnik to Record video segments using your iSight camera and upload them to YouTube.

upload video to YouTube

To use Vidnik, run the app, then click the record button to start recording. Click it again to stop. Trim to just the golden moments you want to keep, as in the screen shot above. Fill in the required title, description, and so on. Click the upload button. That's it.

Part 2, Use Vidnik to upload videos to youtube
You can drag movies made in other programs onto Vidnik's column of movies, and then click the upload button. And to use another program to do a little post-production, use the Gear menu to show Vidnik's movie file in the Finder. Edit the movie in the other program, and then upload it.Vidnik can only support videos such as: 3GP, AVI, DAT, MOV, MP4, M4A, WAV, AAC. It does not support ASF, FLV, MPEG, RM, WMV, MP3, AC3.
You can use the video converter for Mac to convert your videos to the formats that Vidnik can run.
If you want to upload DVD to TouTube, you need to use DVD ripper to rip DVD to video formats supported by YouTube first. If you are Mac user, you can use this DVD ripper for Mac .

upload DVD to YouTube

2010年11月5日星期五

How to put movies on an iPod

How to put movies on an iPod is always a problem that most iPod users are confused about. There are many tools can help you to convert video on iPod, such as avi iPod Converter for Mac, Mpeg 4 iPod Converter, 3gp converter for iPod and so on. Those tools can help you to put avi, wmv, 3gp, Mpeg on iPod easily. This is the easiest way to put movies on an iPod. You can also put movies from one iPod to another one and from computer to your iPod directly with iPod transfer tools.

This guide includes two Parts:
Part 1: How to put movies on an iPod for Windows (convert & transfer)
Part 2: How to put movies on an iPod for Mac (convert & transfer)

Part 1: How to put movies on an iPod for Windows
A. With Converter
Step 1: Download and install Aiseesoft iPod Video Converter.

put movies on an iPod for Windows With Converter

Step 2: Add Video
Click “Add File” button to load your movies that you want to put on iPod.
Step 3: Choose output format
You can choose your output format according to your iPod’s generation from the drop-down list named “profile”. You can also adjust the settings of your output video by clicking “Settings” button.
Step 4: Start Conversion
Click “Start” button to begin your conversion.

B. With Transfer
Step 1: Free download Aiseesoft iPod Transfer.

put movies on an iPod for Windows With Transfer

Step 2: Plug iPod
Plug your iPods or iPhones to computer
Step 3: Find movies
Find the movies that you want to put on your iPod from the other iPod.
Step 4: Transfer
Click “Transfer” button

Part 2: How to put movies on an iPod for Mac
A. With Converter
Step 1: Download and install Aiseesoft iPod Video Converter for Mac.

put movies on an iPod for Mac with Converter

Step 2: Add File
Click “Add File” button to load your movies that you want to put on iPod.
Step 3: Profile and Settings
Choose your output video’s profile from a drop-down list and you can also adjust the settings of your output movie.
Step 4: Conversion
Click “Start” button to begin your conversion.

B. With Transfer
Step 1: Download and install Aiseesoft iPod Manager for Mac.

put movies on an iPod for Mac with Transfer

Step 2: Plug
Plug your iPod via USB cable.
Step 3: Find Movies
Find your movies you want to put your iPod from your local disk.
Step 4: Transfer
Click Transfer button to begin your transfer and seconds later you will get your movies on your iPod.

2010年11月3日星期三

Truth Lies Here

This past August, the left-leaning San Francisco–based Web site AlterNet posted a remarkable scoop: members of a group calling itself the Digg Patriots were banding together to promote conservative-leaning online stories and to drive down the rankings of stories that the group felt showed a liberal bias.

Read the rest of this post on the original site

2010年11月2日星期二

The Android UI Dilemma: Unify or Differentiate?

The topic of User Interfaces always solicits strong views. It’s a bit like TV – everyone is an expert on it because everyone uses it. Those who have been in the mobile industry a while have seen the tide of UI control flow in and out.

Read the rest of this post on the original site

2010年11月1日星期一

Intel Cuts Ribbon on Billion-Dollar Plant in Vietnam

In Ho Chi Minh City today, Intel officially opened what CEO Paul Otellini called “the largest and most sophisticated assembly test facility in Intel’s global manufacturing network.” The $1 billion plant began cranking up in June, making chipsets for mobile devices. Just Tuesday, Otellini presided over the opening of another big Asian investment–a $2.5 billion semiconductor manufacturing plant in Dalian, China. In a pre-emptive defense against criticism for exporting jobs, the chip giant said last week it planned to invest between $6 billion and $8 billion on future generations of manufacturing technology in its U.S. facilities.